
Ever since Google released device images for the Android L Preview, I have been itching to install it on my own Nexus 7 device. I finally had some downtime during my lunch hour yesterday, and I was SO EXCITED to finally get to play with in person. I’ve been trying to deal with the native Android emulator with the L Preview, and it makes me want to throw my computer across the room (SOOO SLOOOOOOWW!!!!!! ARGHLFJDSLFD)…. so it would be awesome to just have an actual device running L.
I started out here, the Android docs for setting up your device with L. This is where I got the system image for the Nexus 7. These docs shot me over here, which explains how to flash your device with a factory image of Android.
Here are the instructions from Google’s site, with my annotations in red.
*** Begin Google Steps ***
Instructions
In order to flash a device using the files below, you need to have the fastboot tool. You can get the fastboot tool either:
- From a compiled version of the the Android Open Source Project.
- Or, from the
platform-tools/directory in the Android SDK. Be sure that you have the latest version of the Android SDK Platform-tools from the SDK Manager.
Once you have the fastboot tool, add it to your PATH environment variable (the flash-all script below must be able to find it). Also be certain that you’ve set up USB access for your device, as described in the Using Hardware Devices guide.
Caution: Flashing a new system image deletes all user data. Be certain to first backup any personal data such as photos.
To flash a system image:
- Download the appropriate system image for your device below, then unzip it to a safe directory. To be clear, unzip this into a safe/empty directory on your computer
- Connect your device to your computer over USB.
- Start the device in fastboot mode with one of the following methods:
- Using the adb tool: With the device powered on, execute:
adb reboot bootloader
- Using a key combo: Turn the device off, then turn it on and immediately hold down the relevant key combinationfor your device. For example, to put a Nexus 5 (“hammerhead”) into fastboot mode, press and hold Volume Up + Volume Down + Power as the device begins booting up.
- Using the adb tool: With the device powered on, execute:
- If necessary, unlock the device’s bootloader by running:
fastboot oem unlock
The target device will show you a confirmation screen. (This erases all data on the target device.)
- Open a terminal and navigate to the unzipped system image directory. on your computer
- Execute the
flash-allscript. This script installs the necessary bootloader, baseband firmware(s), and operating system.
Once the script finishes, your device reboots. You should now lock the bootloader for security:
- Start the device in fastboot mode again, as described above.
- Execute:
fastboot oem lock
Locking the bootloader does not wipe any data, but when you want to flash it again, you must run fastboot oem unlock again, which will wipe the data.
*** End Google Steps ***
So this all seems straightforward enough, except that at step 6 (execute the flash-all script), I got this:
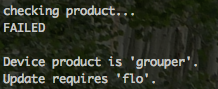
Nooooooo!!! So that totally sucked. My device had been wiped clean and I didn’t even get my L Preview. On the Factory Images for Nexus Devices site, there were several images for Nexus 7, and I figured I could just flash one of those to my device (using the same flash-all steps from above). However, I didn’t find ‘grouper’ in any of the image options! For sure, I thought my little tablet was done for at this point.
A long and panicked search finally revealed that ‘grouper’ is the name for my device hardware, and ‘nakasi’ is the name for the ROM OS image. The ROM name ‘nakasi’ is totally listed on the Factory Image site. Yay! (It seriously took me way too long to find this… I feel like Google should have some note on their site next to the ROM images, saying which production hardware they can be loaded on).
So I finally re-flashed and locked up my device to its original state. All is back to normal, and I now know silly things about the Google naming conventions, but sadly… no L preview.
I uncovered this beauty in my search for all things grouper… so maybe I will tackle this at some point? I have no idea what I am doing, but maybe I can figure it out. If I can, I’ll be sure to write about how I did it!
They probably could have been a bit more clear that the L-Preview is only available for the 2013 Nexus 7 [razor/flo], and not the original Nexus 7 [nakasi/grouper].
Don’t attempt to build and flash from the current AOSP “l-preview” tag, it’s an incomplete release. It includes some core services, and components that are required for GPL compliance. It won’t build into a working system image yet.
Also, if you plan to keep a device available for flashing new system image updates (like updates to L-Preview, perhaps), it’s best to keep the bootloader unlocked. It doesn’t have to be locked for the device to run properly, and you avoid forcing another data wipe if you only want to flash the new system.
Thanks so much for the advice! How does one know that the l-preview tag is an incomplete release? Do you just search through the code and look for key components, or is there a special commit message for a ‘ready’ release?
Very nice article, exactly what I wanted to find.